Showing posts with label ioc. Show all posts

Thursday, December 8, 2016

MediatR, FluentValidation, and Ninject using Decorators

Notebook

I recently had to fiddle with getting Ninject to use decorators for validation with Jimmy Bogard's library, MedatR. Sure, there's tons of blogs out there. There's even some articles on the MediatR and Ninject sites. I had problems getting them to work. So, here's my solution.

CQRS

I've been a fan of the CQRS pattern for some time. For me it's just seems to be a more elegant way to do things. It has some cons: there are usually more classes, and the workflow is not always as clear.

CQRS is Command Query Responsibility Separation (or Segregation). Martin Fowler has a good posting which describes it. It's what it sounds like: separating code logic into commands, queries, and (sometimes) events. One common way of implementing the pattern is to have small objects which are little more than DTOs. These objects are passed to handlers which perform logic based on the contents of the small object.

MediatR

Some time ago, I created a set of classes I used for doing this in projects. These classes were based of Jimmy Bogard's work. Fast-forward a couple years, and I've discovered his library, MediatR. It's as good or better than the set of classes I was using. That was enough for me to make the switch, since I'm a fan reuse when possible.

MediatR is well documented, so I won't repeat all of it. But, for a basic understanding, here's a test showing how a command can be handled by MediatR:

 1
 2
 3
 4
 5
 6
 7
 8
 9
10
[Test]
public void ItShouldHandleBasicCommands()
{
    var mediator = GetMediator();

    var command = new Command();
    var response = mediator.Send(command);

    response.Should().NotBeNull();
}

The basic working pieces are the command and the handler. MediatR receives a command, and dispatches it to the appropriate handler. This is what they look like:

 1
 2
 3
 4
 5
 6
 7
 8
 9
10
11
public class Command : IRequest<Response>
{
}

public class CommandHandler : IRequestHandler<Command, Response>
{
    public Response Handle(Command message)
    {
        return new Response();
    }
}

Registering commands and command handlers is pretty easy. Since I've been using Ninject a lot lately, here's an example of registration using Ninject's convention-based registers. It says, find all the handler interfaces, and bind them.

1
2
3
4
kernel.Bind(scan => scan.FromThisAssembly()
    .SelectAllClasses()
    .Where(o => o.IsAssignableFrom(typeof(IRequestHandler<,>)))
    .BindAllInterfaces());

There are a couple other registrations which are important when hooking MediatR and Ninject up. Registering the IMediator interface depends on three calls. The instance factory calls tell MediatR how to resolve single or multiple instances. Then, of course, we register MediatR.

1
2
3
4
5
kernel.Bind<SingleInstanceFactory>()
    .ToMethod(context => (type => context.Kernel.Get(type)));
kernel.Bind<MultiInstanceFactory>()
    .ToMethod(context => (type => context.Kernel.GetAll(type)));
var mediator = kernel.Get<IMediator>();

Validation and Decorators

The decorator pattern is a way of adding behavior to an object without changing the object itself. Decorators can be used to add a number of cross-cutting concerns to another class. One common use is adding input validation. Wrapping a command handler with a decorator makes it possible to validate the command, before the handler processes it. The following command and command handler simply returns a response.

 1
 2
 3
 4
 5
 6
 7
 8
 9
10
11
12
public class Foo : IRequest<Response>
{
    public string Message { get; set; }
}

public class FooHandler : IRequestHandler<Foo, Response>
{
    public Response Handle(Foo message)
    {
        return new Response();
    }
}

If we wanted to ensure the command, Foo, has a message, we'd want to validate it. FluentValidation is a really handy validation package. Validation requires a validation class, and those classes need to be registered with Ninject.

This is an example of a simple validator. It checks to see if the Message property is empty. If it is, it will return an error.

1
2
3
4
5
6
7
public class FooValidator : AbstractValidator<Foo>
{
    public FooValidator()
    {
        RuleFor(ping => ping.Message).NotEmpty();
    }
}

Registering the validator with Ninject is pretty easy. This line binds all validators in the assembly.

1
2
3
4
kernel.Bind(scan => scan.FromThisAssembly()
    .SelectAllClasses()
    .InheritedFrom(typeof(AbstractValidator<>))
    .BindAllInterfaces());

The next step is to work in a class which will use the validator. The class below comes from Jimmy Bogard's site. It's a pretty common example of how to implement a decorator class which will validate a command, before it is passed to the next handler class.

 1
 2
 3
 4
 5
 6
 7
 8
 9
10
11
12
13
14
15
16
17
18
19
20
21
22
23
public class ValidatingHandler<TRequest, TResponse> : IRequestHandler<TRequest, TResponse>
    where TRequest : IRequest<TResponse>
{
    private readonly IRequestHandler<TRequest, TResponse> handler;
    private readonly IValidator<TRequest> validator;

    public ValidatingHandler(IRequestHandler<TRequest, TResponse> handler, IValidator<TRequest> validator)
    {
        this.handler = handler;
        this.validator = validator;
    }

    [DebuggerStepThrough]
    public TResponse Handle(TRequest message)
    {
        var validationResult = validator.Validate(message);

        if (validationResult.IsValid)
            return handler.Handle(message);

        throw new ValidationException(validationResult.Errors);
    }
}

The next step is working out how to configure Ninject to create a handler and decorate it. This blog post has a really good description of the process. I've distilled it down for validation below. It says, "Register the handlers. When a validating handler is created, inject a handler. When a handler is requested, return the validating handler." To be honest, I'm not quite sure why the ValidatingHandler has to be registered twice.

When Ninject is asked to create a handler, it first creating a validating handler. It injects the correct command handler and validator into the validating handler.

 1
 2
 3
 4
 5
 6
 7
 8
 9
10
11
12
kernel.Bind(scan => scan.FromThisAssembly()
    .SelectAllClasses()
    .Where(o => o.IsAssignableFrom(typeof(IRequestHandler<,>)))
    .BindAllInterfaces());

kernel.Bind(scan => scan.FromThisAssembly()
    .SelectAllClasses()
    .InheritedFrom(typeof(IRequestHandler<,>))
    .BindAllInterfaces()
    .Configure(o => o.WhenInjectedInto(typeof(ValidatingHandler<,>))));

kernel.Bind(typeof(IRequestHandler<,>)).To(typeof(ValidatingHandler<,>));

The tests below capture what should happen when the command's message is empty or not.

 1
 2
 3
 4
 5
 6
 7
 8
 9
10
11
12
13
14
15
16
17
18
19
20
21
[Test]
public void ItShouldProcessCommands()
{
    var mediator = GetMediator();

    var command = new Foo { Message = "valid ping" };
    var response = mediator.Send(command);

    response.Should().NotBeNull();
}

[Test]
public void ItShouldValidateTheCommand()
{
    var mediator = GetMediator();

    var ping = new Foo();
    Action act = () => mediator.Send(ping);

    act.ShouldThrow<ValidationException>();
}

Conclusion

There it is. That's the basics of setting up command validation with Ninject, MediatR, and FluentValidation. It's also a good demonstration of how a decorator can be used to modify behavior without changing existing objects.

As always, there is a sample project on GitHub which has the code from this blog.


Thursday, March 7, 2013

Building a Service App: Adding Windsor and TopShelf

Preface

In the last post we started with a basic exception handling clause in our console application. This time, we'll be dropping in TopShelf, Windsor, and some Logging bits. The example code is available on GitHub.

The Service Class

The service class will be very simple to start. All it will do is write a couple messages to our logger:

    public interface IExampleService
    {
        void Start();
        void Stop();
    }

    public class ExampleService : IExampleService
    {
        private readonly ILogger logger;

        public ExampleService(ILogger logger)
        {
            this.logger = logger;
        }

        public void Start()
        {
            logger.Debug("The service was started.");
        }

        public void Stop()
        {
            logger.Debug("The service was stopped.");
        }
    }

To make this class available elsewhere, we'll need to register it with our IoC container, Windsor. There are a lot of different ways to register components. This time, we'll use an installer. Installers are a convenient way to segregate the registration of your application's components.

    public class MyInstaller : IWindsorInstaller
    {
        public void Install(IWindsorContainer container, IConfigurationStore store)
        {
            container.Register(
                Component.For<IExampleService>().ImplementedBy<ExampleService>()
                );
        }
    }


We'll need to add other components to this as things go along. But for now, it's a good start.

Updating Program.Main()

Now that we have a service class and an installer we can modify the Program.Main() method.

        static void Main()
        {
            try
            {
                var container = ContainerFactory();

                RunTheHostFactory(container);
            }
            catch (Exception exception)
            {
                var assemblyName = typeof(Program).AssemblyQualifiedName;

                if (!EventLog.SourceExists(assemblyName))
                    EventLog.CreateEventSource(assemblyName, "Application");

                var log = new EventLog { Source = assemblyName };
                log.WriteEntry(string.Format("{0}", exception), EventLogEntryType.Error);
            }
        }

The ContainerFactory() method creates a new instance of the container. It then configures the container with the appropriate services.

        private static IWindsorContainer ContainerFactory()
        {
            var container = new WindsorContainer()
                .Install(Configuration.FromAppConfig())
                .Install(FromAssembly.This());
            return container;
        }

The next method, RunTheHostFactory(), covers the bulk of the TopShelf implementation. It uses the TopShelf HostFactory static class to perform the actual work.


        private static void RunTheHostFactory(IWindsorContainer container)
        {
            HostFactory.Run(config =>
                {
                    config.Service<IExampleService>(settings =>
                        {
                            // use this to instantiate the service
                            settings.ConstructUsing(hostSettings => container.Resolve<IExampleService>());
                            settings.WhenStarted(service => service.Start());
                            settings.WhenStopped(service =>
                                {
                                    // stop and release the service, then dispose the container.
                                    service.Stop();
                                    container.Release(service);
                                    container.Dispose();
                                });
                        });

                    config.RunAsLocalSystem();

                    config.SetDescription("This is an example service.");
                    config.SetDisplayName("My Example Service");
                    config.SetServiceName("MyExampleService");
                });
        }

TopShelf's HostFactory use our container to instantiate our service. It also cleans up when the service is stopped. This is the basic TopShelf implementation. Calls to .WhenPaused(), and .WhenContinued() can be added to the HostFactory to handle when the service is paused and resumed in the service control panel.

First Run

At this point it's possible to build and install our service. A handy thing about TopShelf is that it greatly simplifies using generic services. Running our service from the Visual Studio debugger shows us we have some basic functionality (red tic marks indicate the logger entries made by the service class):

The console app being run in the debugger.

There are some other basic things we can do with a TopShelf-based application. We can run the executable as any other console app can be run:

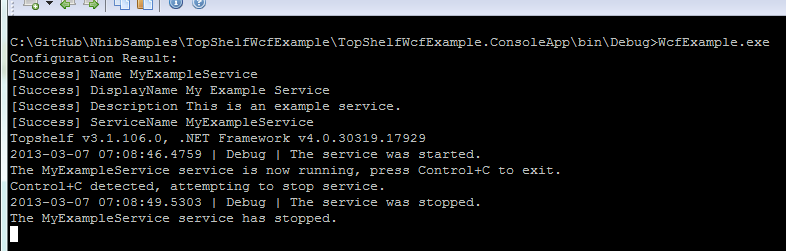
TopShelf app being run as a console app.

Installing the service is pretty done by adding a parameter, install, to the command:

Output of the WcfExample.exe install command.

Once a service is installed, it can be started and stopped:

Example of the WcfExample.exe start command.

Example of the WcfExample.exe stop command.

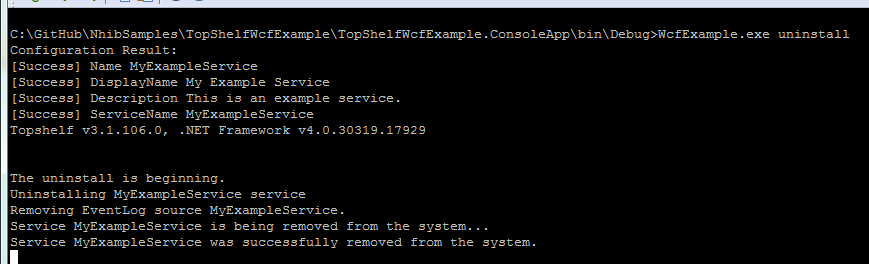
Finally, the service may be uninstalled:

Example of the WcfExample.exe uninstall command.

Conclusion

We covered how to get started with TopShelf. We also looked at setting up an IoC to work with a TopShelf-based application. Next we'll look a little more at logging, and how we can use a component to configure our service.

Tuesday, April 24, 2012

IoC: Windsor TypedFactoryFacility and Generics

Preface

Castle.Windsor is a powerful IoC framework. Since being cajoled into using it by a co-worker, I've come to really like it's features. Today I'm making a brain dump of something cool the TypedFactoryFacility can do. For those that don't know, this facility provides, "... automatically generated abstract factories..."

The Problem

I was creating a service host which exposed a few endpoints. These in turn called the business specific functionality. The service class already had four or five business specific methods on it. That's a lot of dependencies to put in a constructor.

    public class DrinkServiceWithoutFactory : IDrinkService
    {
        private readonly Fridge fridge;
        private readonly Machine machine;

        public DrinkServiceWithoutFactory(Fridge fridge, Machine machine)
        {
            this.fridge = fridge;
            this.machine = machine;
        }

        public IList<Can> GetCans()
        {
            return fridge.Dispense();
        }

        public IList<Bottle> GetBottles()
        {
            return machine.Dispense();
        }
    }

    public class Fridge : IDispenser<Can>
    {
        public IList<Can> Dispense()
        {
            Console.WriteLine("Creating 1 Can...");

            return new List<Can>
                   {
                       default(Can)
                   };
        }
    }

    public class Machine : IDispenser<Bottle>
    {
        public IList<Bottle> Dispense()
        {
            Console.WriteLine("Creating 2 bottles...");

            return new List<Bottle>
                   {
                       default(Bottle),
                       default(Bottle)
                   };
        }
    }

The Solution

An abstract factory was used to create the business-specific objects on demand, reducing the number of dependencies being injected into the constructor. the TypedFactoryFacility provides a handy means of creating delegate- or interface- based abstract factories automagically. What's not illustrated on the Castle documents site is that it can also create factories with generic methods.

The interface-based factory docs page explains how to create and use a factory interface. It doesn't really mention that the create method can also contain a generic. Below is an example of one that does.

    public interface IDispenserFactory
    {
        T Create<T>()
            where T : IDispenser;

        void Release(IDispenser iDispenser);
    }


This depends on two other definitions:

    public interface IDispenser
    {
        
    }

    public interface IDispenser<T> : IDispenser
        where T : class 
    {
        IList<T> Dispense();
    }
Now that we have the factory setup, we can register the components:
    public class Program
    {
        static void Main()
        {
            try
            {
                var container = new WindsorContainer();

                container.AddFacility<TypedFactoryFacility>();

                container.Register(
                    Component.For<Demo>(),
                    Component.For<Machine>(),
                    Component.For<Fridge>(),
                    Component.For<IDispenserFactory>().AsFactory(),
                    Component.For<IDrinkService>().ImplementedBy<DrinkService>()
                    );

                var demo = container.Resolve<Demo>();
                demo.Run();
            }
            catch (Exception exception)
            {
                Console.WriteLine(exception);
            }   
            finally
            {
                Console.ReadKey();
            }
        }
    }
    public class Demo
    {
        private readonly IDrinkService service;

        public Demo(IDrinkService service)
        {
            this.service = service;
        }

        public void Run()
        {
            var bottles = service.GetBottles();
            Console.WriteLine("Bottles created: {0}", bottles.Count);

            var cans = service.GetCans();
            Console.WriteLine("Cans created: {0}", cans.Count);
        } 
    }

We can then change the service implementation to use the abstract factory:

    public class DrinkService : IDrinkService
    {
        private readonly IDispenserFactory factory;

        public DrinkService(IDispenserFactory factory)
        {
            this.factory = factory;
        }

        public IList<Can> GetCans()
        {
            var fridge = factory.Create<Fridge>();
            return fridge.Dispense();
        }

        public IList<Bottle> GetBottles()
        {
            var machine = factory.Create<Machine>();
            return machine.Dispense();
        }
    }

The results (quick and dirty):

Console output of the different classes.
The results...

Summary

This was just a quick brain dump to illustrate that the TypedFactoryFacility can do generics as well.