Showing posts with label how-to. Show all posts

Thursday, August 10, 2017

Building a Pipeline (the Template Pattern)

Building a Simple Pipeline

A lot of my development experience has been building back-end systems. There's been plenty of times where something I've built needed to process a request which was composed of a number of tasks. These tasks had to be performed in the correct sequence forming an algorithm. I've heard these things called many different names including Pipelines.

Unfortunately, many times this need leads to a class which contains both the steps of the algorithm, and the logic to complete the steps. These classes quickly turn into huge monsters. They also tend to become a real pain to test. It turns out, there's a GoF pattern for them: Template Method Design Pattern.

In other words, I wanted to express these simple algorithms like this:

 1
 2
 3
 4
 5
 6
 7
 8
 9
10
11
12
13
14
15
16
17
18
public class FileCreator : IRequestHandler<CreatePackage>
{
    private readonly IPipeline<CreatePackage> pipeline;
    
    public FileCreator(IPipeline<CreatePackage> pipeline)
    {
        this.pipeline = pipeline;
    }
    
    public void Handle(CreatePackage request)
    {
        pipeline.Subject(request);
        pipelline.Do<BoxTheItems>();
        pipelline.Do<CreateTheShippingLabel>();
        pipeline.Do<ShipTheBox>();
        pipeline.Do<SendShippingNotification>();
    }
}

PS - MediatR is awesome. That's where IRequestHandler<T> comes from.

Enter LittlePipeline

LittlePipeline is a small library, or set of example code on how one can build a template that is easy to read, easy to test, and can work with an IoC container. It's designed to be a starting point, not an end-all solution to the problem. The gist of using the library (or classes if you want to copy/paste the code) is simple...

Start with a subject class. This class is the guy who holds the data necessary to process the request. It can be as dumb (or smart) as you need. The only requirement is the subject be a reference object (a class).

1
2
3
4
5
6
public class CreatePackage
{
    public int OrderId { get; set; }
    public Address ShipTo { get; set; }
    public string TrackingNumber { get; set; }
}

Create any number of tasks. These tasks should implement the ITask<T> interface where T is the subject type you created earlier.

 1
 2
 3
 4
 5
 6
 7
 8
 9
10
11
12
13
14
15
public class SendShippingNotification : ITask<CreatePackage>
{
    private readonly IBus bus;
    
    public SendShippingNotification(IBus bus)
    {
        this.bus = bus;
    }

    public void Run(CreatePackage subject)
    {
        var notification = new ShippingNotification { TrackingNumber = subject.TrackingNumber };
        bus.Publish(notification);
    }
}

Use the baked-in pipeline creator, or your favorite IoC container to register the tasks, and create the pipeline. Then, use it like in the class above. Here's the built-in, no frills, no guaranties example.

1
2
3
var pipeline = MakePipeline.ForSubject<FirstTestSubject>()
    .With<Increment>(() => new Increment())
    .Build();

Oh, and this is what testing a pipeline looks like (with FakeItEasy):


 1
 2
 3
 4
 5
 6
 7
 8
 9
10
11
12
13
14
15
16
17
18
19
20
21
22
23
24
25
26
27
28
29
30
31
32
33
public class PipelineTestExample
{
    [Test]
    public void ThePipelineCanBeTested()
    {
        var pipeline = A.Fake<IPipeline<FirstTestSubject>>();
        var example = new ThingThatUsesThePipeline(pipeline);

        var subject = new FirstTestSubject();
        example.Run(subject);

        A.CallTo(() => pipeline.Subject(subject)).MustHaveHappened()
            .Then(A.CallTo(() => pipeline.Do<Increment>()).MustHaveHappened())
            .Then(A.CallTo(() => pipeline.Do<Square>()).MustHaveHappened());
    }
}

public class ThingThatUsesThePipeline
{
    private readonly IPipeline<FirstTestSubject> pipeline;

    public ThingThatUsesThePipeline(IPipeline<FirstTestSubject> pipeline)
    {
        this.pipeline = pipeline;
    }

    public void Run(FirstTestSubject subject)
    {
        pipeline.Subject(subject);
        pipeline.Do<Increment>();
        pipeline.Do<Square>();
    }
}

That's It

There you have it, a simple template class that (hopefully) helps clean up some code by separating the algorithm steps from their implementations. The code is on github. The ReadMe.md file gives some information about how it might be tested.

Friday, December 23, 2016

MediatR, FluentValidation, and Ninject using Decorators (Pt. 2)

Validate all the Things?

The last post showed how to combine MediatR, FluentValidation, and Ninject to handle the validation of requests handled by MediatR. The drawback in the previous post is that all requests must have a corresponding validator implemented. Here, we'll look at using the null object pattern to bypass validation when a validator isn't present.

Null Object What?

The null object pattern is a way to pass an object which represents nothing, but does not throw a runtime exception when used. This pattern can be used to add default behavior to a process when there is nothing for the process to use.


 1
 2
 3
 4
 5
 6
 7
 8
 9
10
11
12
13
14
15
16
17
18
19
20
21
22
23
    public class ValidatingHandler<TRequest, TResponse> : IRequestHandler<TRequest, TResponse>
        where TRequest : IRequest<TResponse>
    {
        private readonly IRequestHandler<TRequest, TResponse> handler;
        private readonly IValidator<TRequest> validator;

        public ValidatingHandler(IRequestHandler<TRequest, TResponse> handler, IValidator<TRequest> validator)
        {
            this.handler = handler;
            this.validator = validator;
        }

        [DebuggerStepThrough]
        public TResponse Handle(TRequest message)
        {
            var validationResult = validator.Validate(message);

            if (validationResult.IsValid)
                return handler.Handle(message);

            throw new ValidationException(validationResult.Errors);
        }
    }

The handler above is taken from the last post. It accepts a handler and validator for a given request. It validates the request, then either passes the request to the next handler, or throws an exception. Ninject will throw an exception when it cannot find an appropriate validator for the request.


1
2
3
4
    public class NullValidator<TType> : AbstractValidator<TType>
    {
        
    }

Enter a null validator. This validator has no rules. When used, it will return no errors, because there are no rules defined in it. Because it's defined as a generic, it can be used to validate any request. When the handler processes a request, the validation passes by default, and the request is passed down the chain.

The cool thing is there's no extra steps needed. Just add the null validator to the solution. It will be picked up by Ninject in the normal registration process. When Ninject can't find the appropriate validator for a request, it will fall back to the generic implementation.

PS...

That's all there is to adding a class which will provide a default behavior of passing requests that have no validation rules defined. Adding code like this is also a great example of the open-closed principle: It was possible to extend the behavior of the validator without changing the code of the validator. So, there ya go. Default, passing validation using the null object pattern.

As always, the code is on GitHub.

Thursday, December 8, 2016

MediatR, FluentValidation, and Ninject using Decorators

Notebook

I recently had to fiddle with getting Ninject to use decorators for validation with Jimmy Bogard's library, MedatR. Sure, there's tons of blogs out there. There's even some articles on the MediatR and Ninject sites. I had problems getting them to work. So, here's my solution.

CQRS

I've been a fan of the CQRS pattern for some time. For me it's just seems to be a more elegant way to do things. It has some cons: there are usually more classes, and the workflow is not always as clear.

CQRS is Command Query Responsibility Separation (or Segregation). Martin Fowler has a good posting which describes it. It's what it sounds like: separating code logic into commands, queries, and (sometimes) events. One common way of implementing the pattern is to have small objects which are little more than DTOs. These objects are passed to handlers which perform logic based on the contents of the small object.

MediatR

Some time ago, I created a set of classes I used for doing this in projects. These classes were based of Jimmy Bogard's work. Fast-forward a couple years, and I've discovered his library, MediatR. It's as good or better than the set of classes I was using. That was enough for me to make the switch, since I'm a fan reuse when possible.

MediatR is well documented, so I won't repeat all of it. But, for a basic understanding, here's a test showing how a command can be handled by MediatR:

 1
 2
 3
 4
 5
 6
 7
 8
 9
10
[Test]
public void ItShouldHandleBasicCommands()
{
    var mediator = GetMediator();

    var command = new Command();
    var response = mediator.Send(command);

    response.Should().NotBeNull();
}

The basic working pieces are the command and the handler. MediatR receives a command, and dispatches it to the appropriate handler. This is what they look like:

 1
 2
 3
 4
 5
 6
 7
 8
 9
10
11
public class Command : IRequest<Response>
{
}

public class CommandHandler : IRequestHandler<Command, Response>
{
    public Response Handle(Command message)
    {
        return new Response();
    }
}

Registering commands and command handlers is pretty easy. Since I've been using Ninject a lot lately, here's an example of registration using Ninject's convention-based registers. It says, find all the handler interfaces, and bind them.

1
2
3
4
kernel.Bind(scan => scan.FromThisAssembly()
    .SelectAllClasses()
    .Where(o => o.IsAssignableFrom(typeof(IRequestHandler<,>)))
    .BindAllInterfaces());

There are a couple other registrations which are important when hooking MediatR and Ninject up. Registering the IMediator interface depends on three calls. The instance factory calls tell MediatR how to resolve single or multiple instances. Then, of course, we register MediatR.

1
2
3
4
5
kernel.Bind<SingleInstanceFactory>()
    .ToMethod(context => (type => context.Kernel.Get(type)));
kernel.Bind<MultiInstanceFactory>()
    .ToMethod(context => (type => context.Kernel.GetAll(type)));
var mediator = kernel.Get<IMediator>();

Validation and Decorators

The decorator pattern is a way of adding behavior to an object without changing the object itself. Decorators can be used to add a number of cross-cutting concerns to another class. One common use is adding input validation. Wrapping a command handler with a decorator makes it possible to validate the command, before the handler processes it. The following command and command handler simply returns a response.

 1
 2
 3
 4
 5
 6
 7
 8
 9
10
11
12
public class Foo : IRequest<Response>
{
    public string Message { get; set; }
}

public class FooHandler : IRequestHandler<Foo, Response>
{
    public Response Handle(Foo message)
    {
        return new Response();
    }
}

If we wanted to ensure the command, Foo, has a message, we'd want to validate it. FluentValidation is a really handy validation package. Validation requires a validation class, and those classes need to be registered with Ninject.

This is an example of a simple validator. It checks to see if the Message property is empty. If it is, it will return an error.

1
2
3
4
5
6
7
public class FooValidator : AbstractValidator<Foo>
{
    public FooValidator()
    {
        RuleFor(ping => ping.Message).NotEmpty();
    }
}

Registering the validator with Ninject is pretty easy. This line binds all validators in the assembly.

1
2
3
4
kernel.Bind(scan => scan.FromThisAssembly()
    .SelectAllClasses()
    .InheritedFrom(typeof(AbstractValidator<>))
    .BindAllInterfaces());

The next step is to work in a class which will use the validator. The class below comes from Jimmy Bogard's site. It's a pretty common example of how to implement a decorator class which will validate a command, before it is passed to the next handler class.

 1
 2
 3
 4
 5
 6
 7
 8
 9
10
11
12
13
14
15
16
17
18
19
20
21
22
23
public class ValidatingHandler<TRequest, TResponse> : IRequestHandler<TRequest, TResponse>
    where TRequest : IRequest<TResponse>
{
    private readonly IRequestHandler<TRequest, TResponse> handler;
    private readonly IValidator<TRequest> validator;

    public ValidatingHandler(IRequestHandler<TRequest, TResponse> handler, IValidator<TRequest> validator)
    {
        this.handler = handler;
        this.validator = validator;
    }

    [DebuggerStepThrough]
    public TResponse Handle(TRequest message)
    {
        var validationResult = validator.Validate(message);

        if (validationResult.IsValid)
            return handler.Handle(message);

        throw new ValidationException(validationResult.Errors);
    }
}

The next step is working out how to configure Ninject to create a handler and decorate it. This blog post has a really good description of the process. I've distilled it down for validation below. It says, "Register the handlers. When a validating handler is created, inject a handler. When a handler is requested, return the validating handler." To be honest, I'm not quite sure why the ValidatingHandler has to be registered twice.

When Ninject is asked to create a handler, it first creating a validating handler. It injects the correct command handler and validator into the validating handler.

 1
 2
 3
 4
 5
 6
 7
 8
 9
10
11
12
kernel.Bind(scan => scan.FromThisAssembly()
    .SelectAllClasses()
    .Where(o => o.IsAssignableFrom(typeof(IRequestHandler<,>)))
    .BindAllInterfaces());

kernel.Bind(scan => scan.FromThisAssembly()
    .SelectAllClasses()
    .InheritedFrom(typeof(IRequestHandler<,>))
    .BindAllInterfaces()
    .Configure(o => o.WhenInjectedInto(typeof(ValidatingHandler<,>))));

kernel.Bind(typeof(IRequestHandler<,>)).To(typeof(ValidatingHandler<,>));

The tests below capture what should happen when the command's message is empty or not.

 1
 2
 3
 4
 5
 6
 7
 8
 9
10
11
12
13
14
15
16
17
18
19
20
21
[Test]
public void ItShouldProcessCommands()
{
    var mediator = GetMediator();

    var command = new Foo { Message = "valid ping" };
    var response = mediator.Send(command);

    response.Should().NotBeNull();
}

[Test]
public void ItShouldValidateTheCommand()
{
    var mediator = GetMediator();

    var ping = new Foo();
    Action act = () => mediator.Send(ping);

    act.ShouldThrow<ValidationException>();
}

Conclusion

There it is. That's the basics of setting up command validation with Ninject, MediatR, and FluentValidation. It's also a good demonstration of how a decorator can be used to modify behavior without changing existing objects.

As always, there is a sample project on GitHub which has the code from this blog.


Thursday, February 6, 2014

RabbitMQ Federated Queues

Preface

RabbitMQ added support for federated queues in v3.2.0. This feature gives a simple way to move messages from one Rabbit cluster to another. I'll show you one way to set this up. The sample code can be found on GitHub. I'm using EasyNetQ to handle the publishing and subscription. It's a very nice RabbitMQ client library. Check it out.

The Clusters

Note: The virtual host names are not the same on the two clusters. Broker A is using the virtual host FederationDemo. Broker B is using the virtual host FederatedStuff.

The RabbitMQ documentation does cover the federation plug-in.  In our scenario, there are two clusters. Each is an upstream for the other. Message hops are at 1 to prevent the messages from circling back to the publisher. Below are pictures of the upstreams defined on each of the clusters.

Shows the upstream definition on Broker A.
Broker A Upstream

Shows the upstream definition on Broker B.
Broker B Upstream


Each broker will need to have a policy defined. This policy is used by the broker to figure out what things come from the upstream bluster. The policies are very similar for both clusters. Below are pictures of the policies:

Federation Policy on Broker A

Federation Policy on Broker B


The Clients

This example will use two console applications. Each will subscribe to and publish two messages. The messages will ping-pong between the two clients. The first client, FooConsole, will publish two messages: start, and stop. The second client, BarConsole, will publish the following: started and stopped.

This example uses two clients. A message from one client will be transported to another. Then a response message will be transported back to the original client.The message sequence is Start, Started, Stop, and Stopped.

I've put the publishing and subscriptions into one class, so we could see everything going on. Both classes, Foo and Bar, are very similar. Here's a look at the Foo class:


Foo subscribes to two messages: Started and Stopped. It then publishes a Start message to get the ball rolling. On the other end, Bar subscribes to Start and Stop messages. It responds to each message with one of its own messages. A Start from Foo causes Bar to send Started. A Stop from Foo causes Bar to send a Stopped message.

Wiring Two Joints

When an app uses EasyNetQ to subscribe, EasyNetQ creates the queues and exchanges for us. This doesn't happen when working with federated queues. The queues will be federated, but there will be no bindings made on the upstream cluster. The pictures below show the downstream and upstream clusters after a client subscribes to a message.

Upstream (publisher) Federated Queues

Downstream (subscriber) Federated Queues


The last little bit is to bind the exchange to the queue on the upstream cluster. This allows the messages to flow from the upstream publisher to the downstream subscriber.

Federated Queue Without Binding
Publishing Exchange Bound To Queue


With everything put together, it's now possible to show the two console apps passing messages across the broker. Note: I've disabled EasyNetQ's default debug logging by using a null logger.

The Console Display


Wrapping It Up

The addition of federated queues to RabbitMQ really simplifies transporting messages between clusters. Hopefully this helps show how you can get two clients to communicate across a federation.

Wednesday, August 14, 2013

Getting Started With RabbitMQ

Preface

I was tasked with giving a quick RabbitMQ intro to another development group. This post is the result of that task. Most of this stuff will be regurgitated from other sources on the web. It's just meant to help people get up and running.

First we'll look at installing RabbitMQ. Next we'll do some basic configuration, and take a quick peek at the management plug-in. Finally, we'll build a couple simple console apps to use the broker.

RabbitMQ is based on Erlang. There is a Wikipedia article which summarizes what RabbitMQ is. There's also a Google Tech Talk video on YouTube.

This article will assume that you know how to use Visual Studio: create solutions, add projects to solutions, etc. It will also assume that you are familiar with using NuGet.

Getting Ready

Before doing the exercises in this tutorial, you'll need to grab the Erlang and RabbitMQ installers.

Installers
  1. Erlang - R16B01 was used.
  2. RabbitMQ - 3.1.4 was used.
Tools Used
  1. Visual Studio 2012
  2. NuGet
  3. EasyNetQ - v0.11.1.104 was used.
  4. Windows 7 - No, we haven't switched, and we might not. ;P
Installing Erlang and RabbitMQ

The RabbitMQ installation page describes how to install the components. It's pretty short and simple. It amounts to first installing Erlang, then installing RabbitMQ. The default settings should suffice.

The installers should take care of any firewall settings. If they don't, you may see a dialog similar to the one below. Go ahead and add the rules for Erlang.

Windows Firewall dialog for Erlang.


The RabbitMQ management plug-in uses a different port: 15672. If you want to access the management page remotely, you'll need to add the appropriate firewall rules for it.

Copy The Cookie

Once installation is complete, you'll want to copy the .erlang.cookie file to your RabbitMQ profile directory. Doing this now will avoid some headaches later in life, especially if you decide to cluster nodes. It should be located in your %systemroot% directory. Copy it to your %appdata%/RabbitMQ directory. It is important that these files be identical.

Batch Files and Initial Status

The installer should have added items to your Start menu. They'll be located in Start->All Programs->RabbitMQ Server. Open the RabbitMQ Command Prompt (sbin dir) shortcut.

Start menu with RabbitMQ stuff.


This will open a command prompt. A number of operations can be performed with this console window: starting/stopping the broker, enabling plug-ins, etc. Checking the broker's status can be done by entering 'rabbitmqctl status' at the prompt.

Sample 'rabbitmqctl status' output.


Enabling the Management Plug-in

The next step to perform is to enable the management plug-in. This plug-in provides a web interface for controlling the broker. It can be used to manage users, exchanges, etc. The management plug-in can be issuing the commands illustrated in the following image. Also note that in most cases, I've found it necessary to restart the RabbitMQ service from the services control panel.

Enabling the management plug-in.

The commands are (in order):

  1. rabbitmqctl stop_app
  2. rabbitmq-plugins enable rabbitmq_management
  3. rabbitmqctl start_app


Using the Management Web Page

The plug-in docs describe many of the features available. We're going to use the UI to create a test user and a virtual host. Later we'll use it to see the broker at work, create a queue, and alter some bindings.

You can access the management UI by opening a browser and navigating to http://localhost:15672. You'll be prompted with the login screen. The default username and password are guest/guest. There are a number of tabs available after logging in. The first is the Overview:

RabbitMQ management Overview.


First we'll create a virtual host for testing. Virtual hosts are managed in the Virtual Host tab of the Admin screen. We'll create one called Sandbox:

RabbitMQ management UI Virtual Hosts screen.


Users are managed in the Users tab of the Admin screen. Expand the 'Add a user' accordion and enter a name along with a password. For this example, I used SandboxUser as the username, and sandbox as the password:


Users must have permission to access virtual hosts. There are a few ways to do this, but we'll use the Virtual Hosts tab of the Admin screen. Click on the Sandbox virtual host and expand the 'Permissions' accordion. Select the user name in the 'User' drop down and click the 'Set Permission' button. Do this for both the SandboxUser and guest users:


The Sample Apps

The source code in this article can be found on GitHub. The solution is divided into three projects: Publisher, Subscriber, and Messages. The name of each project implies what it does. I'm bypassing use of an IoC or test projects for simplicity. Hopefully, I'll get some time in a future post to illustrate how one can mix an IoC container and do some TDD...

Here's what it looks like:

Sample solution contents.


The publisher sends messages to the broker. The subscriber listens to the broker for a message. The message contract is defined in the Messages project. It is referenced in both the Publisher and Subscriber.

The publisher and subscriber projects both reference a library called EasyNetQ. EasyNetQ provides a fairly simple API for interacting with a RabbitMQ broker. At the heart of this is the IBus interface. IBus is used in publishing and subscribing to messages. Our apps use a BusFactory class to create an instance of this interface:

    public static class BusFactory
    {
        public static IBus Create()
        {
            var settings = ConfigurationManager.ConnectionStrings["rabbit"];

            if (settings == null || string.IsNullOrEmpty(settings.ConnectionString))
                throw new InvalidOperationException("Missing connection string.");

            return RabbitHutch.CreateBus(settings.ConnectionString);
        }
    }


The BusFactory class uses a connection string defined in the app.config:

    <connectionStrings>
        <add name="rabbit" connectionString="host=localhost;virtualHost=Sandbox;username=SandboxUser;password=sandbox;prefetchcount=1;" />
    </connectionStrings>


The heart of our demo is in the DemoPublisher. This class illustrates the heart of the publishing operation. A message is created, a publishing channel is opened, and the message is published.

    public class DemoPublisher
    {
        private readonly IBus bus;

        public DemoPublisher(IBus bus)
        {
            this.bus = bus;
        }

        public void Publish()
        {
            var message = new ExampleMessage { Greeting = "Hello, world!" };

            using (var channel = bus.OpenPublishChannel())
                channel.Publish(message);
        }
    }


At the other end of the demo is the subscriber. The DemoSubscriber.ListenForAMessage() method uses an instance of IBus to notify the broker that it is listening for messages of type 'ExampleMessage'. When a message of that type is received, it writes the greeting to the console, and marks the done flag as true.

    public class DemoSubscriber
    {
        private readonly IBus bus;

        public DemoSubscriber(IBus bus)
        {
            this.bus = bus;
        }

        public void ListenForAMessage()
        {
            var done = false;

            bus.Subscribe<ExampleMessage>("subscriber", message =>
            {
                Console.WriteLine(message.Greeting);
                done = true;
            });

            SpinWait.SpinUntil(() => done);
        } 
    }


Running the Publisher

When the publisher is run by itself for the first time, EasyNetQ will create an exchange. However the message sent to the broker seems to disappear. This is because there is no queue defined to receive it. We can create a test queue to catch the message.

First we create a queue:

Creating a queue in the management UI.


Then we bind the exchange to the queue. This can be done either in the queue detail view, or in the exchange detail view. This example shows it being done in the queue detail view. This view is reached by clicking on the queue name, after it's been created. It's important to note that the name must match exactly. It's okay to leave the 'Routing key' and 'Arguments' sections blank.

Binding an exchange to a queue in the management UI.


When the publisher sends a message to the broker, that message is directed to the queue, TestQueue.

Showing the message count in a queue.

Running the Subscriber

When EasyNetQ makes a subscription, it creates the queue and automatically binds it to the exchange. We can see the results both in the console output, and in the queues on the management page:

Showing the sample output from two console apps; one publisher and one subscriber.

Showing the queues with both apps active.

Run the Subscriber First

In creating the subscriptions and publishing the message, EasyNetQ handles the creation of the exchanges and queues for you. Be default, RabbitMQ will discard messages for which there is no destination queue. Thus, you will want to ensure that the subscribers are initialized, before you publish a message.

Wrapping It Up

That's about it for creating a simple demo for RabbitMQ. There are a lot of topics which we haven't covered: clustering, federations, high availability to name a few. Although a little dated, Manning's RabbitMQ in Action: Distributed Messenging for Everyone is worth a read. The documentation for EasyNetQ and MassTransit are other good references.

Monday, March 11, 2013

Building a Service App: Logging

Preface

In the last post, we saw how to get started hooking things up with Windsor, TopShelf, and NLog. This post will take a look at logging with Windsor and NLog. We'll also look at using a utility called Log2Console to view our log messages as they are generated.

The Packages

This post looks at using the following NuGet packages:
Installing Castle.Windsor-NLog ensures that all the appropriate logging dependencies are included in our application. NLog.Schema adds some Intellisense to help with the NLog.config file.

Initializing the Logger

Windsor's behavior can be extended through the use of facilities. A handy one, available out of the box, is the Logging Facility. We'll be setting up to use NLog as our framework. Windsor is configured to use NLog by adding the appropriate facility:

            container.AddFacility<LoggingFacility>(facility => facility.LogUsing(LoggerImplementation.NLog))

It is possible to specify various options: config file location, log target, etc. We'll be using the default NLog beahvior which looks for a file called NLog.config in the root directory of the assembly.

Configuring the Logger

Adding the NLog.Schema package to a project adds a schema file which can aid in editing the NLog.config file. The NLog wiki is pretty good about documenting the different options. In short, the config is broken into two sections:

  1. Targets. These describe the formatting, content, and destination of the log message.
  2. Rules. These describe what gets logged, and to what target the message is sent.
Viewing Logger Messages

A nifty trick which can be used while you're working on things is to use NLog in conjunction with a utility called Log2Console. To use Log2Console to view log message, you will need to add a receiver. This will allow it to receive messages. First click the Receivers button, then click the Add... button. Add a UDP receiver, leaving the default settings.

The receivers dialog box with a UDP receiver added.

After adding the receiver, the NLog.config file will need to be updated. A Chainsaw target will need to be added. There will also need to be the corresponding rule created:

A snapshot of an NLog.config file highlighting the chainsaw config options.


Once it's setup, Log2Console should catch the messages sent to NLog by your application.

An example of log output in Log2Console.


Conclusion

This showed a quick and dirty way of viewing log messages in real time. It's something that could be useful while working on applications. Next up will be a look at setting up WCF endpoint in our TopShelf app.

Thursday, March 7, 2013

Building a Service App: Adding Windsor and TopShelf

Preface

In the last post we started with a basic exception handling clause in our console application. This time, we'll be dropping in TopShelf, Windsor, and some Logging bits. The example code is available on GitHub.

The Service Class

The service class will be very simple to start. All it will do is write a couple messages to our logger:

    public interface IExampleService
    {
        void Start();
        void Stop();
    }

    public class ExampleService : IExampleService
    {
        private readonly ILogger logger;

        public ExampleService(ILogger logger)
        {
            this.logger = logger;
        }

        public void Start()
        {
            logger.Debug("The service was started.");
        }

        public void Stop()
        {
            logger.Debug("The service was stopped.");
        }
    }

To make this class available elsewhere, we'll need to register it with our IoC container, Windsor. There are a lot of different ways to register components. This time, we'll use an installer. Installers are a convenient way to segregate the registration of your application's components.

    public class MyInstaller : IWindsorInstaller
    {
        public void Install(IWindsorContainer container, IConfigurationStore store)
        {
            container.Register(
                Component.For<IExampleService>().ImplementedBy<ExampleService>()
                );
        }
    }


We'll need to add other components to this as things go along. But for now, it's a good start.

Updating Program.Main()

Now that we have a service class and an installer we can modify the Program.Main() method.

        static void Main()
        {
            try
            {
                var container = ContainerFactory();

                RunTheHostFactory(container);
            }
            catch (Exception exception)
            {
                var assemblyName = typeof(Program).AssemblyQualifiedName;

                if (!EventLog.SourceExists(assemblyName))
                    EventLog.CreateEventSource(assemblyName, "Application");

                var log = new EventLog { Source = assemblyName };
                log.WriteEntry(string.Format("{0}", exception), EventLogEntryType.Error);
            }
        }

The ContainerFactory() method creates a new instance of the container. It then configures the container with the appropriate services.

        private static IWindsorContainer ContainerFactory()
        {
            var container = new WindsorContainer()
                .Install(Configuration.FromAppConfig())
                .Install(FromAssembly.This());
            return container;
        }

The next method, RunTheHostFactory(), covers the bulk of the TopShelf implementation. It uses the TopShelf HostFactory static class to perform the actual work.


        private static void RunTheHostFactory(IWindsorContainer container)
        {
            HostFactory.Run(config =>
                {
                    config.Service<IExampleService>(settings =>
                        {
                            // use this to instantiate the service
                            settings.ConstructUsing(hostSettings => container.Resolve<IExampleService>());
                            settings.WhenStarted(service => service.Start());
                            settings.WhenStopped(service =>
                                {
                                    // stop and release the service, then dispose the container.
                                    service.Stop();
                                    container.Release(service);
                                    container.Dispose();
                                });
                        });

                    config.RunAsLocalSystem();

                    config.SetDescription("This is an example service.");
                    config.SetDisplayName("My Example Service");
                    config.SetServiceName("MyExampleService");
                });
        }

TopShelf's HostFactory use our container to instantiate our service. It also cleans up when the service is stopped. This is the basic TopShelf implementation. Calls to .WhenPaused(), and .WhenContinued() can be added to the HostFactory to handle when the service is paused and resumed in the service control panel.

First Run

At this point it's possible to build and install our service. A handy thing about TopShelf is that it greatly simplifies using generic services. Running our service from the Visual Studio debugger shows us we have some basic functionality (red tic marks indicate the logger entries made by the service class):

The console app being run in the debugger.

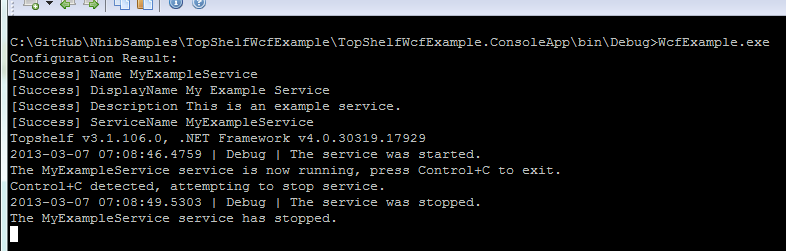
There are some other basic things we can do with a TopShelf-based application. We can run the executable as any other console app can be run:

TopShelf app being run as a console app.

Installing the service is pretty done by adding a parameter, install, to the command:

Output of the WcfExample.exe install command.

Once a service is installed, it can be started and stopped:

Example of the WcfExample.exe start command.

Example of the WcfExample.exe stop command.

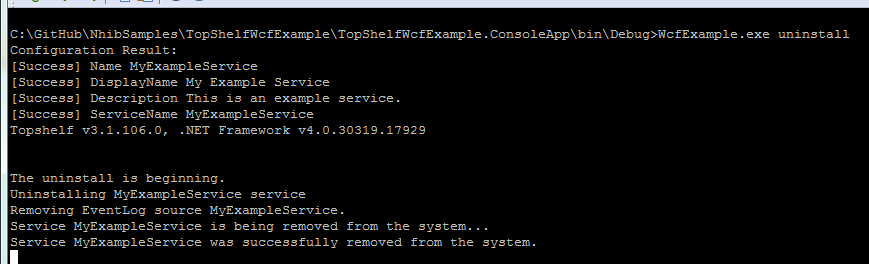
Finally, the service may be uninstalled:

Example of the WcfExample.exe uninstall command.

Conclusion

We covered how to get started with TopShelf. We also looked at setting up an IoC to work with a TopShelf-based application. Next we'll look a little more at logging, and how we can use a component to configure our service.

Tuesday, March 5, 2013

Building a Service App: Intro & Unhandled Exceptions

Introduction

We do a lot of service applications where I work. Most of them are self-hosted. That means a lot of console-style apps. This post is to document some of the stuff we're doing, so we have something of a common template.

We'll be using a few tools/technologies:
The example code will be hosted on GitHub.

We'll get started with a basic unhandled exception handler. This will give us a way to capture the error when the application won't even start, and hasn't had time to initialize the logging framework.

Program.Main() and Unhandled Exceptions

When everything fails, including your logging mechanism, it's nice to know what happened. There's just a ton of things that can and do go wrong. One way to help catch these errors is to log to the an event log.

    public class Program
    {
        static void Main()
        {
            try
            {
                // do something
            }
            catch (Exception exception)
            {
                var assemblyName = typeof(Program).AssemblyQualifiedName;

                if (!EventLog.SourceExists(assemblyName))
                    EventLog.CreateEventSource(assemblyName, "Application");

                var log = new EventLog { Source = assemblyName };
                log.WriteEntry(string.Format("{0}", exception), EventLogEntryType.Error);
            }
        }
    }

What we've done is place a generic exception handler in the Main() method. It catches generic exceptions, logging them all to the event log. This catches anything that hasn't been caught; your basic unhandled exception handler. Now we have a way to see what happened...

An image showing the error in the Application Windows Log.
The EventLog


A picture of the actual error, complete with stack trace.
The captured error message.

Next...

There you have it. An easy way to capture exceptions when the worst happens. Next up, we'll take a look at dependency injection with Windsor.


Friday, February 22, 2013

PowerShell and TopShelf

Preface

A large part of our development involves generic services. TopShelf simplifies the installation and operation of the services we've been creating. When dealing with a number of services, it can still be a pain to install and start each individual service. To ease that pain point, we created a simple PowerShell script to help.

Deploying the Services

One project involved creating a set of services which were passing messages via RabbitMQ. Setting up a server (test or otherwise) involved dropping 3-6 services in a directory, configuring them, and starting them up. The deployment would be similar to the following:

/Parent Directory
    TopShelfHelper.ps1
    /ServiceA Directory
        topshelfhost.exe
        ... (Other Files)
    /ServiceB Directory
        topshelfhost.exe
        ... (Other Files)

The Script

The script is available on GitHub. Here it is for reference:

param(
 [parameter(mandatory=$true)]
 [validateset("start","stop","uninstall", "install")]
 $command
)

$ErrorActionPreference = "Stop"

push-Location

try
{
 get-ChildItem -Path $pwd -Recurse |
  where-Object {$_.name -eq 'topshelfhost.exe'} |
  select-Object fullname |
  foreach-object {& $_.fullname $command}

 "INFO: Operation completed successfully."
}
catch
{
 $Error[0]
 "ERROR: An error occurred performing the operation."
}
finally
{
 pop-Location
}

This script uses Get-ChildItem to look through all the directories in the current directory. When it finds the appropriate .exe file, it executes the TopShelf command on it. This example script uses the name 'topshelfhost.exe' to as the TopShelf enabled app.

Using the script is pretty easy. Just pass it one of the TopShelf commands (start, stop, install, uninstall), and it handles the rest. Here's an example...


Summary

Not the cleanest of scripts, but an example of you PowerShell can be used to ease some other tasks.

Monday, November 19, 2012

NHibernate: One-to-One Mapping With Shared Key

Preface

A reader commented on a different NHibernate post, asking about how one might do some different mappings. This post describes one of those scenarios: One-to-One mappings with a shared key. In this case, the parent entity has a surrogate key. The child is using the same value as its primary key and the same field as the foreign key to the parent.

Code samples for this article are on Github.

The Database

The test project is setup to run against a SQL Server database rather than some in-memory or mocked instance. I've created a quick SQL script to setup the datbase tables. SQL Server 2008 R2 was used for this example. The Express edition should work equally as well. We will be working with two tables:


The UserDetail.UserId is the same value as User.Id. Both are primary keys. There is a one-to-one relationship between the Users table and the UserDetail table. The UserDetail table, you will note, does not have an independent field for the foreign key.

The User Object

The first entity is the User. The User is the parent object. It is defined as follows. The AddDetail method is used to associate the different entities with each other. For example, if we have a new User and a new UserDetail, we can pass the UserDetail into the User.AddDetail() method. This will ensure that the UserDetail is correctly setup as the child of the User.

    public class User
    {
        public virtual long Id { get; set; }
        public virtual string Name { get; set; }
        public virtual UserDetail Detail { get; set; }

        public virtual void AddDetail(UserDetail userDetail)
        {
            Detail = userDetail;
            Detail.AddUser(this);
        }
    }

The User object's mapping is pretty basic. It sets the identity column as being generated by the database. It also sets the one-to-one mapping for the detail.

    public class UserMap : ClassMapping<User>
    {
        public UserMap()
        {
            Table("Users");

            Id(user => user.Id, mapper => mapper.Generator(Generators.Identity));

            Property(user => user.Name);

            OneToOne(user => user.Detail,
                     mapper =>
                     {
                         mapper.ForeignKey("FK_User_Id");
                         mapper.Cascade(Cascade.All);
                     });
        }
    }

The UserDetail Object

Next up is the UserDetail. UserDetail is a child of User, having a one-to-one relationship with its parent. The UserDetail.AddUser() method performs a similar function to the User.AddDetail() method: it helps setup the association between the UserDetail object and a parent User object. The Equals() and GetHashCode() overrides are necessary to accommodate the way we'll be setting up the mapping.

    public class UserDetail
    {
        public virtual long UserId { get; set; }
        public virtual string DriversLicense { get; set; }
        public virtual bool IsDonor { get; set; }
        public virtual User ParentUser { get; set; }

        public virtual void AddUser(User user)
        {
            ParentUser = user;
            UserId = user.Id;
        }

        public override bool Equals(object obj)
        {
            if (ReferenceEquals(null, obj))
                return false;

            if (ReferenceEquals(this, obj))
                return true;

            var a = obj as UserDetail;
            if (a == null)
                return false;

            return a.UserId == UserId;
        }

        public override int GetHashCode()
        {
            unchecked
            {
                var hash = 21;

                hash = hash*37 + UserId.GetHashCode();
                
                return hash;
            }
        }
    }

The UserDetail mapping is a little more involved. Identifier is setup as a composite ID. This allows us to use NHibernates mapper to select the column name and the foreign key value. It also imposes the requirement that we have created the Equals() and GetHashCode() overrides.

    public class UserDetailMap : ClassMapping<UserDetail>
    {
        public UserDetailMap()
        {
            Table("UserDetail");

            ComposedId(mapper => mapper.ManyToOne(o => o.ParentUser, x =>
                                                                     {
                                                                         x.Column("UserId");
                                                                         x.ForeignKey("FK_User_Id");
                                                                     }));

            Property(detail => detail.DriversLicense);
            Property(detail => detail.IsDonor);
        }
    }

Persisting The Entities

One common mistake made when using NHibernate to persist related entities is to not set the relevant properties. In this case, the UserDetail.ParentUser property must be set, so that NHibernate can get the value of the ID property. I then to use a setter method to ensure any values are correctly set. In this case, it's the UserDetail.AddUser() method.

The tests file in the example solution gives two examples for persisting the entities to the database. It highlights how to ensure the critical step which happens just after creating the detailToBeSaved object.

        [TestMethod]
        public void SavingAUserWithADetailObject()
        {
            var userToBeSaved = Builder<User>.CreateNew()
                .With(user1 => user1.Id = 0)
                .Build();
            var detailToBeSaved = Builder<UserDetail>.CreateNew().Build();
            // Don't forget the next line...
            userToBeSaved.AddDetail(detailToBeSaved);

            object save;

            using (var txn = session.BeginTransaction())
            {
                save = session.Save(userToBeSaved);
                txn.Commit();
            }

            var loadedUser = session.Get<User>(save);

            loadedUser.ShouldHave().AllPropertiesBut(user => user.Id).EqualTo(userToBeSaved);
            loadedUser.Detail.ShouldHave().AllProperties().EqualTo(detailToBeSaved);

            using (var txn = session.BeginTransaction())
            {
                session.Delete(loadedUser);
                txn.Commit();
            }
        }

A Common Problem

It's pretty common to forget to initialize the child object before persisting. In this case, the UserDetail cannot exist without its parent User. However, if we do not setup the properties on the UserDetail via the AddUser() method or some other means, NHibernate won't know how to associate things. This results in an exception like the following:
Test method Prabu.Tests.OneToOneTests.SavingAUserWithADetailObject threw exception: NHibernate.Exceptions.GenericADOException: could not execute batch command.[SQL: SQL not available] ---> System.Data.SqlClient.SqlException: Cannot insert the value NULL into column 'UserId', table 'Prabu.dbo.UserDetail'; column does not allow nulls. INSERT fails. The statement has been terminated.
This happens because NHibernate has no way to figure out what it should be inserting in the UserDetail.UserId field. You can prove this by commenting out the lines of the AddUser() method, and running the test.

Summary

It really is easier and better to just have a surrogate key with which to work. NHibernate is flexible enough to accommodate times when the world isn't perfect. I hope this helped show how to get around one of those sticky situations.